.png)
New Zealand Wonderland
March 4th - March 16th 2026.


South Island Photography Road Trip: Queenstown → Wanaka → Mount Cook → West Coast → Fiordland → Queenstown
Photography gear:
Sony A7iii
Sigma lens28mm - 105mm F2.8
Tamron lens 70mm - 180mm F2.8
Tamron lens 28mm - 70mm F2.8
DJI Mini Pro 4
Flashback film camera
UV lens URTH 82mm 8L

New Zealand’s South Island is one of the most spectacular landscape photography destinations on Earth and I am lucky to say it’s only a 2 hour flight from Auckland where I call home. Over the course of this 12 day trip I covered 2700 kms. I travelled through alpine valleys, glacier landscapes, turquoise rivers, fjords, and remote mountain passes — all while living out of a truck called ‘Sunny’ through The Wild Rovers.

This guide documents the full route I followed, including the best photography locations, ideal times to visit, and photography tips that worked well for each scene and also things I would do different next time.
Sunny was picked up from Andie & Craig at The Wild Rovers from the beautiful Jacks Point Golf Course. Andie & Craig were super helpful in showing me all Sunny has to offer before I turned the key and headed on my way.
First stop: Wanaka Region

The drive from Queenstown to Wānaka might be short, but it’s one of those journeys where you’ll want to take your time. The road winds through some seriously beautiful landscapes, rolling hills, wide valleys, and those classic South Island views that make you pull over every five minutes “just for one more photo.”
One of the best stops along the way is the Cardrona Hotel. It’s the kind of place that instantly transports you back in time, with its rustic charm and weathered wooden façade. If you’re into photography, this is a dream spot. This place works well especially in black and white, where the textures and history really come to life.
Not too far from the hotel, things take a slightly more unexpected turn. You’ll stumble across a long stretch of fence… covered in bras. Yep, thousands of them. Known as the Cardrona Bra Fence, it started as a bit of a random act but has since grown into a full-blown roadside attraction. It’s quirky, a little surreal, and somehow kind of iconic.
All up, this short drive is a perfect reminder that sometimes the best travel moments aren’t the big-ticket destinations but more the random, slightly weird, totally memorable stops along the way.

For my first night I camped at a secret spot just before the Boundary Camp Creek Campsite. The Boundary Creek Campsite was shut so I had to think of a new option and I noticed a driveway down to the shoreline right near the Boundary Creek Campsite. There was another vehicle already down there so I went down to join. It was a beauty of a spot right on the water. The hills and surrounding trees kept the wind mostly at bay making this an ideal spot to set up first camp.
The beauty of Sunny is that your camp can be set up in a matter of minutes. Pop the tent, throw your sleeping bag and pillows in, connect your battery pack and you are set.
The mornings wake up was an early one so I set my alarm and got straight to sleep.
Roy’s Peak
Hike summary
Distance: 16 km return
Time: 6 hours return
Elevation gain: hard incline climb. Even surface
I left Boundary Creek Campsite at 02:20 to make Roy’s Peak car park for 03:00. Packed my camera gear, water, snacks plus a jersey and jacket (the top gets cold before the sun comes out).
In hindsight I should have left the drone at the truck as there is no way to fly it up there with all the people around.
Roy’s Peak is one of the most iconic viewpoints in New Zealand. The trail climbs steadily above Lake Wānaka before reaching a famous ridgeline viewpoint. I started this hike just after 03:00 and I am glad I did. The Carpark was full by 04:00 so you need to get in early. After a hard slog of a 8 km inclineI, I made the top by 06:45. I then set up my tripod and camera to attempt a Timelapse of the sunrise. The clouds decided to hog the sun so the timelapse wasn’t exactly as expected but no harm in trying.
The hike is dark but manageable without a head torch. It is also warm as you are climbing an incline the entire time. Once at the top the cold breeze and darkness begin to get you so make sure you have a jersey and a windbreaker with you. I also had gloves. I also ran out of water and on the way down I was seriously regretting not bringing more. Don’t be like me. Stay hydrated because the decline is just as hard as the incline.
There are lots of people when you get to the top so patience is key to getting your own photo on the ridge.


Best time for photography is definitely Sunrise.
Golden light illuminates Lake Wānaka and the surrounding mountains while the valley remains shadowed, creating dramatic depth.
Camera Equipment:
Lens: 50mm - 200mm.
No drones.
Tripod for time lapse
Photography tip
The most photographed spot is just below the summit, where the narrow ridge curves toward the mountains.
Post
This preset is designed to capture the quiet drama of wild landscapes. It leans into muted earth tones, cool shadows, and soft contrast to create a cinematic look that feels both adventurous and introspective.
Rob Roy Glacier Track
Hike summary
Distance: 10 km return
Time: 4 hour return
Elevation gain: moderate climb
After my hike at Roy’s Peak I was a sweaty mess. I decided to head into town to collect some supplies and then headed to stay at Glendhu Campsite for the night. This campsite is sat right on Lake Wānaka. It had no crowd and allowed me to have my own space while I cooked up a feed to some music before sitting down to edit some photos from Roy’s Peak. I paid $42 and shower cost

on top was $4. It had a decent kitchen set up but you needed all your own cookery and plates etc.
Te Rob Roy Glacier hike in Mount Aspiring National Park leads to an incredible viewpoint of a hanging glacier and cascading waterfalls. Unfortunately in March the waterfalls aren’t as prominent.
I would suggest November time if you want to see these best.
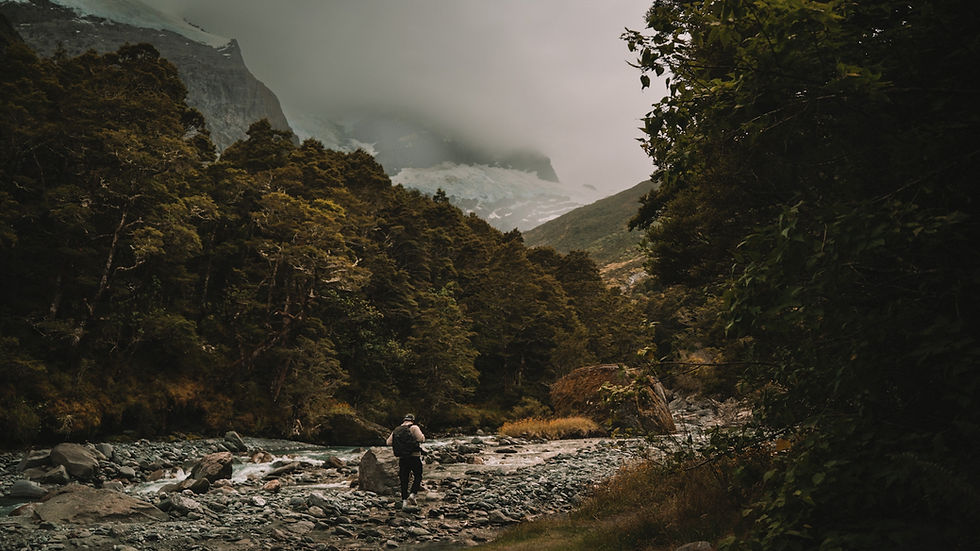
The drive in requires a high car or 4x4 at a minimum. In March the streams on the road were very shallow but I can imagine these get much higher and stronger in other months so be cautious of this.
The car park is massive and provides information as well as toilets and relaxing areas.

Best time for photography
Late morning to early afternoon. I went late morning.
The glacier sits in a deep valley, so the sun needs to be high enough to reach it.
Camera equipment:
Lens: 50mm-110mm.
Drone is useful here.
Tripod for time lapse.

There was a beautiful landscape near the begging of the hike as you begin to head into the bush. The sun rose across the valley and the spray from the waterfall in the valley made this shot quite spectacular.
Drone is possible here as I feel it is not as busy as Roy’s Peak. Plenty of places to step away and launch the drone. I only wish the waterfalls were more abundant but this is for sure a place I’ll return to.
After Rob Roy Glacier I had to hit the road for a long drive to Aoraki/Mount Cook. The drive is 5 hours. I arrived in perfect time to get some amazing dusk/sunset shots of Aoraki/Mount Cook from the world famous Peter’s lookout. These shots have to be some of my favourite and I felt so lucky to have the mountain in full view for them. Sunset is most certainly the best time to take photos here.
I stayed at Glentanner Campsite. The staff at the desk were sooo lovely. The campsite is open setting so you can choose where to set up. I made sure I got a spot with a view of Aoraki/Mount Cook to wake up to. There is laundry on site with coin operated machines. The campsite has a large kitchen set up and have items you can use on site. The campsite has an epic view of Aoraki/Mt Cook and has a walkway down to Lake Pukaki.
There is a magical DOC campsite called the white horse hill which is the trail head for a few of the hikes and in a prime location. This books out weeks in advance so make sure you get in on this.
Make sure you stock up on supplies before getting to Aoraki/Mount Cook because there are no supermarkets around. I had to live off local pies and sandwiches which isn’t a bad thing.

Mount Cook National Park
Peter’s Lookout

This roadside viewpoint offers one of the most famous views in New Zealand: Lake Pukaki leading directly toward Aoraki / Mount Cook.
Best time for photography
Morning or late afternoon.
Midday light flattens the scene and reduces contrast in the mountains.
Photography tip
Walk slightly away from the main parking spot to improve the lake foreground composition.
Hooker Valley Track
Hike summary
Distance: 10 km return
Time: 4 hours return
Elevation gain: moderate and flat
Hooker Valley is one of the most accessible alpine landscapes in New Zealand. Unfortunately it was under repair when I was attempting this. The track is closed just after the suspension bridge. Still a nice photo opportunity near the suspension bridge but would have loved to see more. Do your research on this before you go.
The hooker valley, at certain times of the year, can allow for incredible Astro photography. Do your research on when the moon has a low illumination and when the Milky Way is situated perfectly and then cross your fingers that the sky is clear. This area has very low light pollution making it amazing for this sort of thing.

Best time for photography is
late afternoon or sunset.
Light enters the valley from the west, illuminating glaciers and peaks.
Use the suspension bridges and river as leading lines toward the mountain.
Sealy Tarns Track
Hike summary
Distance: 5.8 km return
Time: 4 hour return
Elevation gain: hard staircase climb
This steep staircase hike offers one of the best elevated views of Mount Cook and the surrounding glacier basin. I was unfortunately unable to do this one due to weather. It was raining this day which I was heart broken about. I read that this is not easy. Early start and hard hike usually means major rewards! Get it done because I know I wish I could have.
Best time
Sunrise
Sunrise light illuminates Mount Cook directly and creates dramatic golden tones across the glaciers.
You can continue slightly above the tarns for an even better view toward the Mueller Hut route. I will be doing this on my return here as well as actually staying in the Mueller Hut.
Tasman Glacier Viewpoint
Hike summary
Distance: 1.5 km return
Time: 30–45 minutes return
Elevation gain: moderate staircase climb
Tasman Glacier Viewpoint is one of the easiest but very rewarding hikes. The walk is short, but the view opens out over the glacier valley, moraine walls, and Tasman Lake. In the winter I read that the icebergs in the lake are much bigger which would be awesome to see. You can even do a boat tour to get up close and personal to the glacier. Something I’ll do on my return here.

Best time for photography is the morning.
This is usually the best time because sunlight begins to reach deeper into the valley and gives shape to the glacier and surrounding ridges.
Early sunrise can still leave the valley in shadow, while midday light can flatten the scene.
A camera shot I missed but saw as I was leaving is near the top of the climb up. At the last few steps I noticed a guy sitting higher than the steps towards the mountain peak. Unfortunately there were clouds about so I didn’t snap the shot but it would look amazing when the mountain is roaring.
Photography tip
A longer lens helps a lot here because the glacier sits further away than many people expect. Use the moraine walls and the lake as framing elements, and look for floating icebergs if conditions allow.
Extra note

The nearby Blue Lakes area is also worth a short stop for a slightly different angle over the valley. I only walked by these as I feel they don’t offer too much in March.
Go to the Sir Edmund Hillary cafe. Awesome spot with amazing views. Pies and coffee are class here and reasonably priced for the South Island. They have good wifi and plenty of other options than just pies (but I like my pies).
I spent a total of 2.5 days in Aoraki/Mt Cook area. This area was a major highlight of the trip. I recommend adding a buffer here so you can account for bad weather days. There is also so many more hikes to do, not to mention, doing a glacier helicopter ride and also a boat ride towards the glacier. Most people only come to a place as far as New Zealand once in their life so you may as well do this epic things while you can. Not doing Sealy Tarns is a major regret of mine and I wish I could have done it. Not to mention the Mueller hut. I really look forward to coming here in the surrounding winter months.

Lake Tekapo

The diatance to Lake Tekapo from Aoraki/Mt Cook is just over 1.5 hours and is a very easy drive. I wish I had timed it better in Lake Tekapo but due to the tough time constraints with this trip.
If I had perfect weather this is what I would have done in Tekapo.
On arrival I went to the Church of the Good Shepherd. I used the whispy tussock in the foreground. The church is so much smaller than I expected. I scoped out potential spots for setting up for Astrophotography in the night but I could see the billowing low cloud above me was not going to let me have my time.
The astrophotography behind the Church is something I intend to try and shoot one day. It looks amazing!!
Make sure to do your research but generally 03:00-05:00 is the best time and you will need to make sure the moon has low lumination and is below the horizon. Check where the milky way will be as well as prep some camera settings. Clear skies is most most most important and these are most potent in summer time.
I missed the chance but the Lupins flower bloom is from mid November - early Jan and they make for a nice vibrant photo when teamed with the sun and glow of the lake.
I didn't get the chance to see these iconic flower shots due to being here in March and they were very much dead. The lake was still quite beautiful under the cloudy sky. I used my time in Tekapo as a reset. Emptied the van and repacked it. I even managed to buy a new memory card from the servo (service station) which came in handy near the end of the trip.
Burkes Pass
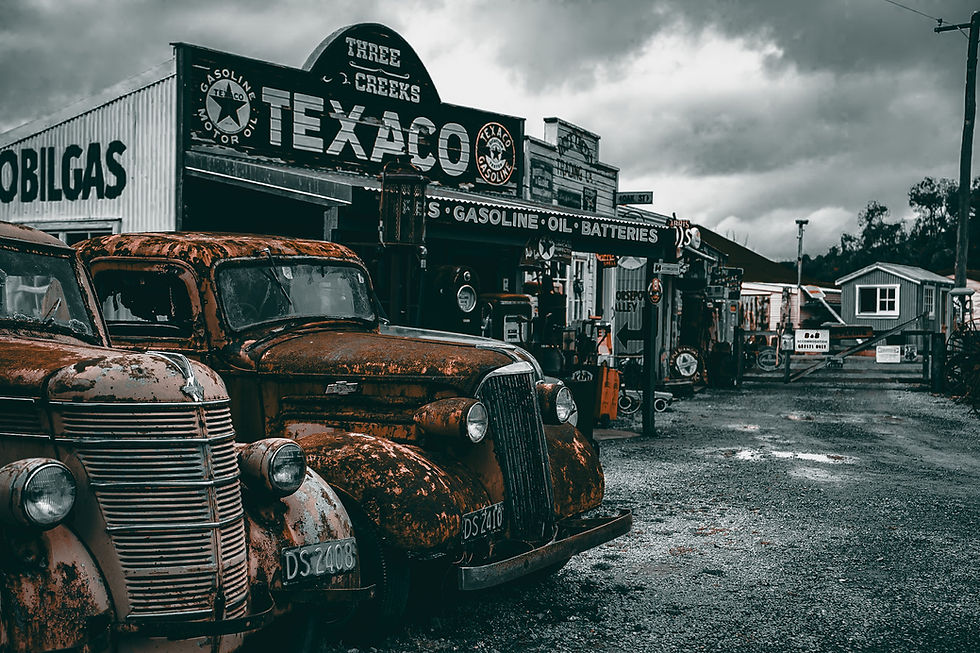
As I began my drive from Lake Tekapo towards Arthurs Pass I noticed this old western american time capsule out of the corner of my eye. I had to turn around and go and see what it was all about. It did not disappoint. This place was an epic time capsule and a great spot to take some snaps and get a coffee before the drive. Presets used here are a dark moody rust which you can purchase from my site soon!
Arthur’s Pass
Arthur’s Pass introduces rugged alpine terrain, dramatic mountain passes, and one of the most scenic drives in New Zealand.
As I arrived to Arthur’s Pass I pulled into Arthur’s Pass cafe and store. I am so glad I did.

I was greeted by a Kea that was just moving from table to table trying to steal what it could. The naughty Kea knocked over bottles, stole food and was not phased by the people around it. I only wish I had my Tamron 70mm - 180mm lens on the camera at this moment to get a very personal shot of the Kea. I did what I could at the time. The pie here was great and they had a reasonable amount of supplies here if you needed. I grabbed a pack of ginger nuts, a coffee, pie and a sausage roll and was on my way for the first hike in this area.
Devils Punchbowl Falls
The hike itself is short but surprisingly rewarding. From the car park, the trail crosses a swing bridge and climbs steadily through beech forest. The path quickly becomes a staircase of wooden steps that zig-zags up the hillside, with occasional openings that reveal the surrounding valley.

After around 20–30 minutes of climbing, the forest suddenly opens and the full scale of the waterfall comes into view.
Standing at the viewing platform you’re directly facing the falls, which crash down a near-vertical rock wall. In wet weather the water volume increases dramatically and mist fills the basin below, creating an incredible sense of power.
This is one of those locations where cloud, mist and rain actually improve the scene, making the mountains feel larger and the landscape more dramatic.
Photography tips
The viewing platform gives you a clear composition with the waterfall framed by the steep valley walls.
A wide lens works well to capture the scale of the cliffs and surrounding forest.
For smooth waterfall movement, use a slower shutter speed with a tripod.
I climbed down from the track and near the actual stream from the waterfall to get a more inclusive shot. Being down here also allowed for a great perspective shot on the levels of the stream for a subject. Gives perspective of how high the waterfall face actually is and allows you to get some more cinematic feel.
Best time to visit
Early morning or late afternoon works best, when the light enters the valley at an angle and adds texture to the rock face.
Overcast weather can also be excellent here, as it softens shadows and enhances the mood of the waterfall.
I did late afternoon and was very happy with the results. Drone fully possible here too with limited amount of people on the hike.
Hike summary
Distance: 2 km return
Time: 30–45 minutes return
Elevation gain: moderate staircase climb
Otira Viaduct and Arthur’s Pass Roads
This area is perfect for capturing dramatic road photography and sweeping valley landscapes. It was raining when I arrived here so I couldn't the shot I desired. I really wanted a drone shot of Sunny on the viaduct but it just wasn't going to be possible. The lookout here is actually meant to be a great spot for Kea sightings also.
Best time for photography
Morning or late afternoon.
Photography tip
Use the winding road and valley walls to create strong leading lines. I didn’t have good enough weather to fly the drone here but I feel like it would have been quite the shot going over the viaduct.
I had the energy so I decided to push onwards at this point and stayed at the DOC campsite Lake Mahinapua. It was a little out of town but one of the better DOC sites I stayed at on this trip. Very open space, decent toilets and even a cold shower and also a sink wash area. Can’t ask for much more when paying $18.00 (USD $10.50).

Hokitika Gorge
Hokitika Gorge is famous for its striking turquoise water and suspension bridge.
Hike details
Distance: 2 km return
Time: 30–45 minutes
Difficulty: Easy
Best time for photography
Midday to early afternoon.
I went just before midday and found it decent light on the water.
Places to fly the drone by walking away from people.
Beware of the midgies!! They are relentless here and in the area in general. So hard to fly the drone while swatting them away. They really got me here. I suggest long sleeve and trousers to avoid them. I did see people swimming here also!
Sunlight illuminates the bright blue water.
Use the suspension bridge to frame the river. Also fly the drone in Birds Eye view following the water for a nice shot.

Next was a 2 hour drive to Callery Gorge in the Franz Josef area. I nearly didn't do this but very glad I did.
Callery Gorge
The trail follows the Callery River through dense West Coast forest before reaching a dramatic suspension bridge crossing the gorge. From the bridge you get the best view of the bright turquoise water flowing below, surrounded by thick rainforest and mountain cliffs. Unfortunately due to the time of the year the water was more grey but I still feel like this gave a dramatic look.
Hike details
Distance: about 4–5 km return
Time: 1.5–2 hours return
Difficulty: easy to moderate
I spent a fair bit longer taking photos
Best photo spots
If you find the little side track just before the suspension bridge you can take a nice photo of the stream and ridge. I walked along the rocks and set up the tripod there. Long exposures didn’t turn out as wanted due to the colour of the water but the best shot was the break of sunlight through the bush into the ridge between the cliff edges. It looked like a light from the heavens shining down into the gap.
You may need to get your feet wet to get a good view point of this.


The suspension bridge is the highlight and provides the best composition of the gorge. Wide-angle lenses work well here to capture the bridge leading into the river and surrounding forest.
Further along the trail there are also several openings along the riverbank where you can photograph the colour of the glacial water against the dark rock walls.
There are very small waterfalls on the way to the bridge on the trail that have deep green moss on the rocks which give the epic deep nature feel. I did some long exposures here and was very happy with the result. The deep green nature feel on this hike is amazing!

For smooth water effects, use a slower shutter speed around 1/4 to 1 second with a tripod.
After the two gorge hikes for the day I decided it was time to have some down time and relax a little. I headed to Gillespies Beach DOC camp ground and what a find this was for many reasons. All the DOC camp grounds are $18.00 NZD and the best ones tend to book fast. Make sure you are on it and if you have a more strict plan then you can really get ahead of the game and book them in.
Gillespies was a super unique camp ground. First of all one of the popular view points of Fox Glacier is on the road leading to the camp ground. I feel like the lighting wasn't on my side and I had the bad fortune of breaking my zoom Tamron lens 70mm - 180mm F2.8 (sad times). The view point is very much worth a stop. If you have someone with you who can video a low following shot on a gimbal it would make for some awesome content as the glacier would look much closer to the subject. Give this a search on instagram and I am sure you will find some examples.

Gillespies DOC camp site was also awesome because of its unreal location. It might be one of the best campsites in the world. You not only have a nice picturesque beach that provides great sunsets but also a prime view of Aoraki/Mt Cook in the distance. It was rather surreal. A few midgies about but it is worth battling them for this campsite.


West Coast Waterfalls
Fantail Falls
A quick roadside stop with a wide waterfall cascading over rock terraces.
Super easy walk to this. No more than 5 minutes from parking area. Apple Maps has multiple destinations for this so make sure you get the right one. Cross reference with google search.

Thunder Creek Falls
A tall waterfall dropping from the mountains directly beside the road.
Really epic shot available here. Especially good because it is an easy walk.
These two waterfalls make for some decent opportunities to flex some long exposure photography (like any waterfall). The great thing about these ones is that they are so close to the parking area. Great reward to effort ratio, especially after all the hiking done in the spots above.
After a cruisey day through Haast Pass and visiting all the waterfalls I drove to Wānaka. This drive is 2 hour and 15 minutes long and is rather nice.
There is a photo opportunity before you get to Wānaka. Between Lake Hāwea and Lake Wānaka where the landscape seems to hold its breath. Locals call it 'The Neck' a slender ribbon of land pinched between two vast, glacial lakes, where the road threads quietly through a place that feels both exposed and intimate. There are plenty of spots to pull off and take photos.

The backdrop just seems to be frozen as you drive around. It really is rather magical.
My stay in Wanaka this time was different to my last stay. I chose to stay at Albert Town camp ground. This was a pretty cool spot to stay. It is extremely cheap. You pull in and pay at a parking meter at the front gate. It is a first come, first serve set up and spots are not designated. You can more or less camp anywhere you can park your rig. It sits in Albert Town and has a view of the Wānaka hills and planes as well as the Clutha and Hāwea river meet. Very easy access to all the good hikes in Wanaka and is only $10-$12 NZD per night. Great bang for your buck! I went to the recreational centre to have a shower for $5.00 NZD but you can shower at the laundromat which is 2 mins drive from Albert Town Camp ground. It is called 'The missing socl'. It is coin operated and means your wahsing can be done while you shower. It is about $2.00 NZD for 5 mins of water and will require coins. There is also a Four square shop in this block of shops so you can stock up and not to mention a decent fish and chips store. I reccommend Albert Town camp ground as it is cheap and means you can find your own space. Decent bathrooms and a good reset before the Fiordland stage of the trip!

Fiordland and Milford Road
The drive from Te Anau to Milford Sound is one of the most scenic roads in the world. It is packed with Alpine passes, lakes and many roadside scenic spots. The drive time is 3.5 - 4 hours long over 230km. The route is Crown Range Road -> Queenstown -> Kingston -> Devils Staircase -> Te Anau.

Once I arrived in Te Anau I did some research and planned my route for the following day. I mooched around town and went to a cafe called Sandfly Cafe and did some editing as it was comfortable and had some wifi. Really decent food here also. It was close to the supermarket so I used this opportunity to stock up. I would reccommend getting a decent amount of supplies here. You can spend many days in the Milford Sound area and it is not efficient to continuously drive back and forth to Te Anau. There are many DOC camp grounds near Milford Sound so stock up in Te Anau for a few days atleast. Once I stocked Sunny up I headed to Henry Creek DOC camp ground. Great spot! I could hear the water of the lake as I lay in the tent excited for the day to come in the Milford Sound. Be aware that most of these DOC sites near Milford Sound do not have reception (can be a good thing). I found one near Milford Sound that does, more on that soon.

The next day I was up super early. Alarm rang at 05:30 and I began the drive out to Milford Sound.
This drive is just over 1 hour long and extremely scenic. I decided to get to Milford Sound for the
sunrise and was then going to make all my stops on the way back. The view did not dissapoint and neither did the drive there. Snow on the mountain tips and windy steep roads made it all seem so dramatic. This is definitely one of the best drives I have done.
I recommend getting there early. The boats haven't yet started making their voyages and the water is quiet and still. Makes for better reflective water shots. I was lucky enough to capture these ducks navigating their way through the Milford Sound.

After soaking up the serenity I headed to the cafe to grab a coffeee before making my way back over the hills, first stop on the drive back was 'The Chasm'. On the way over you go through an epic one way tunnel called 'The Homer Tunnel'. This was quite the experience, as I drove through I couldn't help but to think that a mountain was literally above me in that moment, my mind quickly wondered to 'how do they even build this?'. The entrance is also a very common spot to see Kea birds to keep the camera at the ready.
The Chasm

This was a short stop, the walk being only 400 meters. There was closures when I was here so I couldnt get to the ideal view point. There are some side paths but be very very careful, one slip and it can be all over here. The water was sooo powerfull. It was rushing at an enormnous rate. This constant flow is what has carved the formations into the smooth stone. I would love to see this in the surrounding months of winter. There is a view point I found on the way which was decent for some long exposures of flowing water.
After 'The Chasm' I continued my drive and the next stop was 'Monkey Creek'.
Monkey Creek

Beautiful road side stop that is surrounded by dramatic snow capped peaks and crystal clear alpine flowing water stream which is in a wide open valley. This makes for some epic
photography opportunities. I reccommend a stop here if you like to take photos. There is also some opportunity for some epic roadside shots near Monkey Creek to take advantage of the valley and epic backdrops.


The surrounding area to Monkey Creek has many waterfalls to visit right next to the side of
the
road. It is a natures feast around the Milford Sound. I spent hours admiring the area for the day before heading to set up camp.
The camp of choice for my second night in the sounds was the DOC campsite Cascade Creek. This spot was very quiet and I managed to get 1 bar of reception here. It was also right near Eglinton Valley. After having a late lunch at my new campsite I went to Eglinton Valley with my camera. Unfortunately the dusk sun didnt light the valley up the way I was hoping but it was still nice to relax on the grass in the open wilderness that is this beautiful valley. Reccommend a picnic here if you can.

Marian Lake
Hike summary
Distance: 6.3 km return
Time: 3-4 hours return
Elevation gain: moderate climb. Can be uneven
After a quiet early night I was up to tackle one last hike for the trip, the Marian Lake hike. This hike is a 6km 3-4 hours retrun (longer if you take photos and have a bite). Many steep and uneven sections and just be very wary of your ankles on this one. The beginning of the hike walks along some flowing water and I had to stop for some long exposures (seem to be a running theme on this trip).

I found this more difficult than I was expecting and found myself wondering when I was going to arrive at the top at points as it seemed to go on forever. I was met by a spectacular view! The lake provides mirror reflection when the sun is up but go early so you can get the best mirror effects with less water ripples from wind. I wasn't lucky on this occasion and was met with low low fog but I still thought it was very cool. Very dramatic nonetheless. I will return on a day where the sky is clear and I can see the mirror reflection myself.
There is many view points to take advantage here so don't be stuck to the first one you see. Walk around the lake and find different settings.


After Marian Lake I pulled the table and gas cooker out of Sunny and served myself a delicious kiwi breakfast and coffee right in the parking lot. After filling up on good food and caffine I hit the road back to Queenstown. I took the drive slow to appreciate the wonderous nature all around me. This part of New Zealand is spectacular and I felt cheated that as a kiwi I hadn't come down here and appreciated it before. The drive back was a steady 2.5 hours which got me into Queenstown in good time. I decided to spend my last night getting things in order. I packed my gear and Sunny and checked into Lylo hostel. Cheap and cheerful with great bathroom and room facilities as well as a social area on the top floor. Location was also very good! I utilised the laundry set up and planned my last day in the south!

Glenorchy
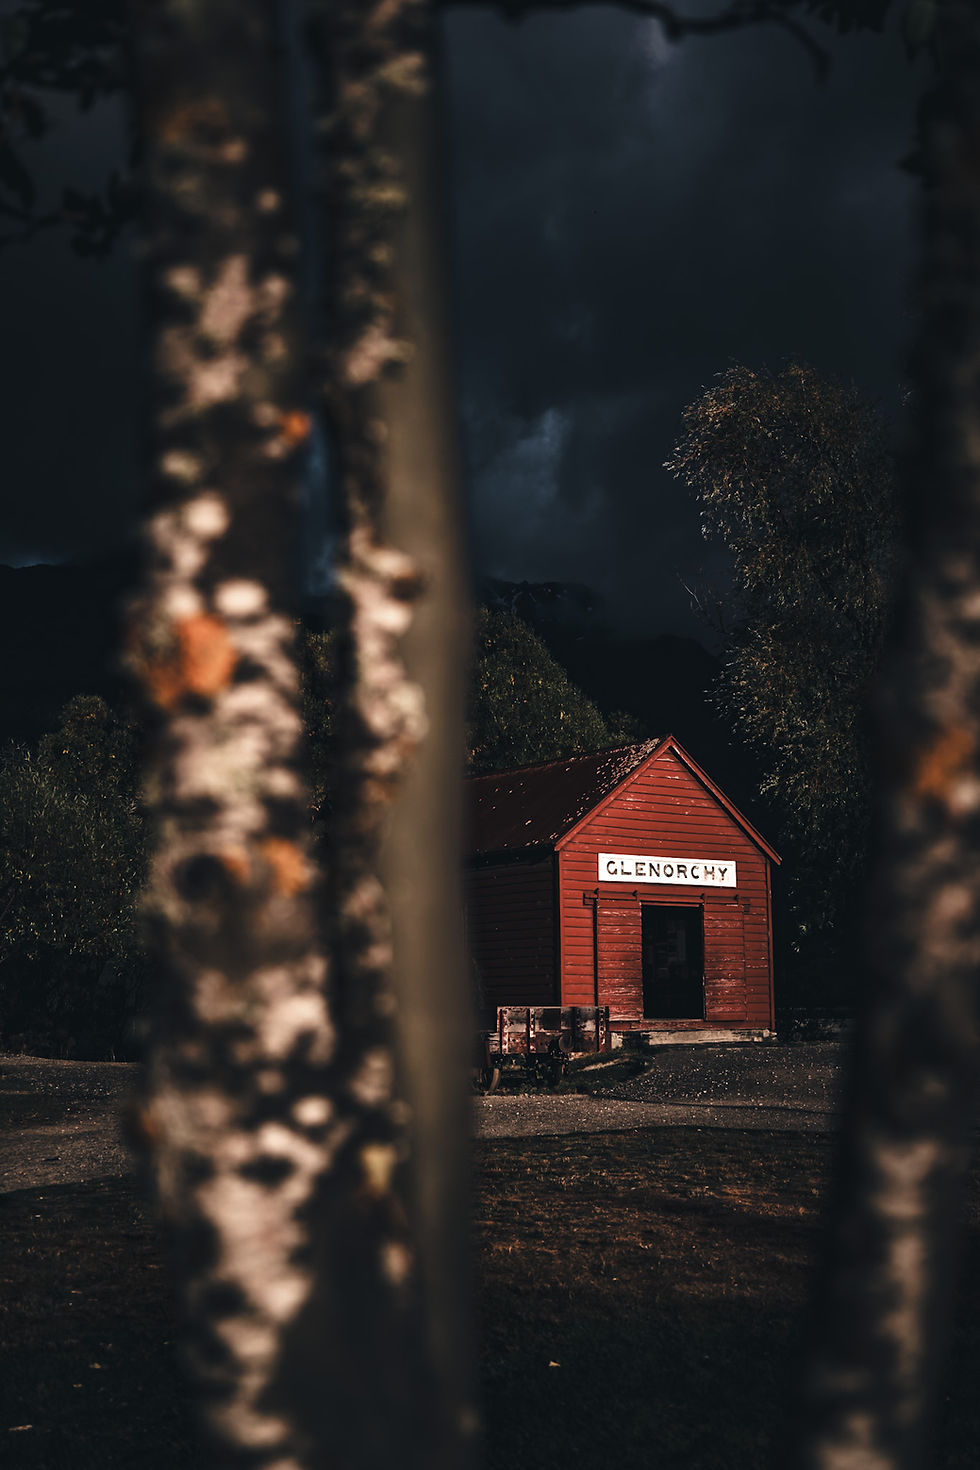
I rose an hour before sunrise to head out to Glenorchy to catch the morning colours. The drive was a scenic 45 minutes long. Very windy and difficult to drive in the dark so drive with caution. Once I arrived I set up my Sony a7iii and Sigma 28mm - 105mm F2.4 on a time lapse to try and see what I could capture. Unfortunately clouds wre not on my team
and they blocked the sun rays. I feel like this would look amazing without the clouds. The sun light would move down the mountain faces in the background and paint colours on the clouds. This will be something I return to try out again. Nonetheless this shed is beautiful to capture regardless of the sky setting. It just seemed to morph into different shapes as the light changed. It was so peaceful and empty. I was also told by Andie from Wild Rovers about the Great Glenorchy Alpine Base camp which is meant to be epic.
I would do the drive to Glenorchy to see the little red shed again and again. It was so picturesque and the area was sooo peaceful. There is also a bit about the history inside the shed which is a nice read.

Overall this south island trip was short and jam packed due to time constraints. If I could do it again I would allow for a lot longer and give space for weather windows. I would highly suggest tying in some multi day hikes to hutts as well as getting in some magical astrophotography. Going in months surrounding winter would also mean that waterfalls are more abundant and the mountains and hills would be snow caped. This would also mean it is heaps colder haha so remember you cant have your cake and eat it too.

The fact this wonderland full of amazing landscapes and adventure is in my own countries back yard makes me sooo excited to do lots more. Any spare time I get at home will likely be spent getting a road trip in.
I highly recommend hitting up Andie @thewildroversnz and getting your own companion like Sunny to see the South Island. Use the @roadynz app for the best things to see and do and follow their instagram for inspiration on things to see. I cannot wait to be back in this Wonderland again.
This South Island journey covers some of the most photogenic landscapes in the world. From glacier valleys and turquoise rivers to dramatic fjords and alpine lakes.
The key to capturing the best images is timing your visits around the light and weather. Many locations look completely different depending on the time of day.
If you’re planning a photography road trip through New Zealand, this route provides an incredible mix of landscapes and unforgettable shooting opportunities.
If you have any questions or need any information on anything dont hesitate to get hold of me in the contact form or on the instagram @imagin3.photography I hope this helps and inspires you to book that trip
Stay Sweet!


Comments